Maven Tutorial
Jakob Jenkov |
Maven is a powerful build tool for Java software projects. Actually, you can build software projects using other languages too, but Maven is developed in Java, and is thus historically used more for Java projects.
The purpose of this Maven tutorial is to make you understand how Maven works. Therefore this tutorial focuses on the core concepts of Maven. Once you understand the core concepts, it is much easier to lookup the fine detail in the Maven documentation, or search for it on the internet.
Actually, the Maven developers claim that Maven is more than just a build tool. You can read what they believe it is, in their document Philosophy of Maven. But for now, just think of it as a build tool. You will find out what Maven really is, once you understand it and start using it.
Maven Version
The first version of this Maven tutorial is based on Maven 3.6.3.
Maven Website
The Maven website is located here:
From this website you can download the latest version of Maven and follow the project in general.
What is a Build Tool?
A build tool is a tool that automates everything related to building the software project. Building a software project typically includes one or more of these activities:
- Generating source code (if auto-generated code is used in the project).
- Generating documentation from the source code.
- Compiling source code.
- Packaging compiled code into JAR files or ZIP files.
- Installing the packaged code on a server, in a repository or somewhere else.
Any given software project may have more activities than these needed to build the finished software. Such activities can normally be plugged into a build tool, so these activities can be automated too.
The advantage of automating the build process is that you minimize the risk of humans making errors while building the software manually. Additionally, an automated build tool is typically faster than a human performing the same steps manually.
Installing Maven
To install Maven on your own system (computer), go to the Maven download page and follow the instructions there. In summary, what you need to do is:
- Set the
JAVA_HOMEenvironment variable to point to a valid Java SDK (e.g. Java 8). - Download and unzip Maven.
- Set the
M2_HOMEenvironment variable to point to the directory you unzipped Maven to. - Set the
M2environment variable to point toM2_HOME/bin(%M2_HOME%\binon Windows,$M2_HOME/binon unix). - Add
M2to thePATHenvironment variable (%M2%on Windows,$M2on unix). - Open a command prompt and type '
mvn -version' (without quotes) and press enter.
After typing in the mvn -version command you should be able to see Maven execute, and the version number of
Maven written out to the command prompt.
Note: Maven uses Java when executing, so you need Java installed too (and the JAVA_HOME environment variable
set as explained above). Maven 3.0.5 needs a Java version 1.5 or later.
I use Maven 3.3.3 with Java 8 (u45).
I have a tutorial about installing the Java SDK in case you are not familiar with that. Remember, it has to be an SDK (Software Developer Kit), not just a JRE (Java Runtime Environment). The JRE does not contain a Java compiler. Only the SDK does.
Maven Overview - Core Concepts
Maven is centered around the concept of POM files (Project Object Model). A POM file is an XML representation of project resources like source code, test code, dependencies (external JARs used) etc. The POM contains references to all of these resources. The POM file should be located in the root directory of the project it belongs to.
Here is a diagram illustrating how Maven uses the POM file, and what the POM file primarily contains:
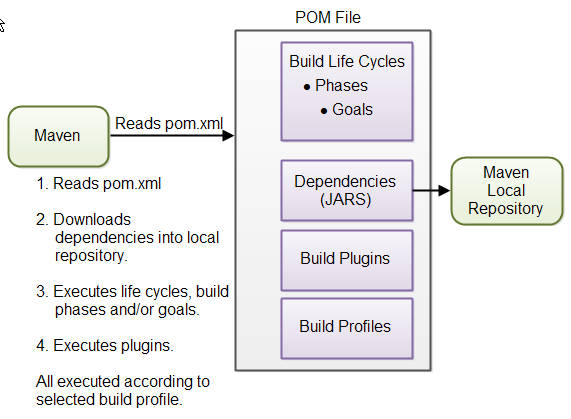 |
| Overview of Maven core concepts. |
These concepts are explained briefly below to give you an overview, and then in more detail in their own sections later in this tutorial.
POM Files
When you execute a Maven command you give Maven a POM file to execute the commands on. Maven will then execute the
command on the resources described in the POM.
Build Life Cycles, Phases and Goals
The build process in Maven is split up into build life cycles, phases and goals. A build life cycle consists
of a sequence of build phases, and each build phase consists of a sequence of goals.
When you run Maven you pass a command to Maven.
This command is the name of a build life cycle, phase or goal. If a life cycle is requested executed, all build
phases in that life cycle are executed. If a build phase is requested executed, all build
phases before it in the pre-defined sequence of build phases are executed too.
Dependencies and Repositories
One of the first goals Maven executes is to check the dependencies needed by your project. Dependencies are
external JAR files (Java libraries) that your project uses. If the dependencies are not found in the
local Maven repository, Maven downloads them from a central Maven repository and puts them in your
local repository. The local repository is just a directory on your computer's hard disk.
You can specify where the local repository should be located if you want to (I do). You can also specify
which remote repository to use for downloading dependencies. All this will be explained in more detail
later in this tutorial.
Build Plugins
Build plugins are used to insert extra goals into a build phase. If you need to perform a set of actions
for your project which are not covered by the standard Maven build phases and goals, you can add a plugin
to the POM file. Maven has some standard plugins you can use, and you can also implement your own in Java
if you need to.
Build Profiles
Build profiles are used if you need to build your project in different ways. For instance, you may need
to build your project for your local computer, for development and test. And you may need to build it
for deployment on your production environment. These two builds may be different. To enable different builds
you can add different build profiles to your POM files. When executing Maven you can tell which build profile
to use.
Maven vs. Ant
Ant is another popular build tool by Apache. If you are used to Ant and you are trying to learn Maven, you will notice a difference in the approach of the two projects.
Ant uses an imperative approach, meaning you specify in the Ant build file what actions Ant should take. You can specify low level actions like copying files, compiling code etc. You specify the actions, and you also specify the sequence in which they are carried out. Ant has no default directory layout.
Maven uses a more declarative approach, meaning that you specify in the Maven POM file what to build, but not how to build it. The POM file describes your project resources - not how to build it. Contrarily, an Ant file describes how to build your project. In Maven, how to build your project is predefined in the Maven Build Life Cycles, Phases and Goals.
Maven POM Files
A Maven POM file (Project Object Model) is an XML file that describes the resources of the project. This includes the directories where the source code, test source etc. is located in, what external dependencies (JAR files) your projects has etc.
The POM file describes what to build, but most often not how to build it. How to build it is up to the Maven build phases and goals. You can insert custom actions (goals) into the Maven build phase if you need to, though.
Each project has a POM file. The POM file is named pom.xml and should be located in
the root directory of your project. A project divided into subprojects will typically have one
POM file for the parent project, and one POM file for each subproject. This structure allows
both the total project to be built in one step, or any of the subprojects to be built separately.
Throughout the rest of this section I will describe the most important parts of the POM file. For a full reference of the POM file, see the Maven POM Reference.
Here is a minimal POM file:
<project xmlns="http://maven.apache.org/POM/4.0.0"
         xmlns:xsi="http://www.w3.org/2001/XMLSchema-instance"
         xsi:schemaLocation="http://maven.apache.org/POM/4.0.0
                      http://maven.apache.org/xsd/maven-4.0.0.xsd">
    <modelVersion>4.0.0</modelVersion>

    <groupId>com.jenkov</groupId>
    <artifactId>java-web-crawler</artifactId>
    <version>1.0.0</version>
</project>
The modelVersion element sets what version of the POM model you are using. Use the one
matching the Maven version you are using. Version 4.0.0 matches Maven version 2 and 3.
The groupId element is a unique ID for an organization, or a project (an open source project, for instance).
Most often you will use a group ID which is similar to the root Java package name of the project. For instance,
for my Java Web Crawler project I may choose the group ID com.jenkov. If the project was an open source
project with many independent contributors, perhaps it would make more sense to use a group ID related to the project
than an a group ID related to my company. Thus, com.javawebcrawler could be used.
The group ID does not have to be a Java package name, and does not need to use the . notation (dot notation) for separating words
in the ID. But, if you do, the project will be located in the Maven repository under a directory structure matching
the group ID. Each . is replaced with a directory separator, and each word thus represents a directory. The group
ID com.jenkov would then be located in a directory called MAVEN_REPO/com/jenkov. The
MAVEN_REPO part of the directory name will be replaced with the directory path of the Maven repository.
The artifactId element contains the name of the project you are building. In the case of my Java Web Crawler
project, the artifact ID would be java-web-crawler. The artifact ID is used as name for a subdirectory
under the group ID directory in the Maven repository. The artifact ID is also used as part of the name
of the JAR file produced when building the project. The output of the build process, the build result that is,
is called an artifact in Maven. Most often it is a JAR, WAR or EAR file, but it could also be something else.
The versionId element contains the version number of the project. If your project has been released
in different versions, for instance an open source API, then it is useful to version the builds. That way
users of your project can refer to a specific version of your project. The version number is used as a name
for a subdirectory under the artifact ID directory. The version number is also used as
part of the name of the artifact built.
The above groupId, artifactId and version elements would result in
a JAR file being built and put into the local Maven repository at the following path (directory and file name):
MAVEN_REPO/com/jenkov/java-web-crawler/1.0.0/java-web-crawler-1.0.0.jar
If your project uses the Maven directory structure, and your project has no external dependencies, then the above minimal POM file is all you need to build your project.
If your project does not follow the standard directory structure, has external dependencies, or need special actions during building, you will need to add more elements to the POM file. These elements are listed in the Maven POM reference (see link above).
In general you can specify a lot of things in the POM which gives Maven more details about how to build your projects. See the Maven POM reference for more information about what can be specified.
Super POM
All Maven POM files inherit from a super POM. If no super POM is specified, the POM file inherits from the base POM. Here is a diagram illustrating that:
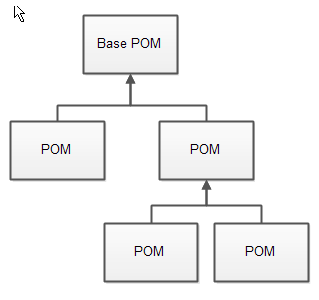 |
| Super POM and POM inheritance. |
You can make a POM file explicitly inherit from another POM file. That way you can change the settings across all inheriting POM's via their common super POM. You specify the super POM at the top of a POM file like this:
<project xmlns="http://maven.apache.org/POM/4.0.0"
         xmlns:xsi="http://www.w3.org/2001/XMLSchema-instance"
         xsi:schemaLocation="http://maven.apache.org/POM/4.0.0
                      http://maven.apache.org/xsd/maven-4.0.0.xsd">
    <modelVersion>4.0.0</modelVersion>

        <parent>
        <groupId>org.codehaus.mojo</groupId>
        <artifactId>my-parent</artifactId>
        <version>2.0</version>
        <relativePath>../my-parent</relativePath>
        </parent>


    <artifactId>my-project</artifactId>
    ...
</project>
An inheriting POM file may override settings from a super POM. Just specify new settings in the inheriting POM file.
POM inheritance is also covered in more detail in the Maven POM reference.
Effective POM
With all this POM inheritance it may be hard to know what the total POM file looks like when Maven executes. The total POM file (result of all inheritance) is called the effective POM. You can get Maven to show you the effective POM using this command:
mvn help:effective-pom
This command will make Maven write out the effective POM to the command line prompt.
Maven Settings File
Maven has two settings files. In the settings files you can configure settings for Maven across all Maven POM files. For instance, you can configure:
- Location of local repository
- Active build profile
- Etc.
The settings files are called settings.xml. The two settings files are located at:
- The Maven installation directory:
$M2_HOME/conf/settings.xml - The user's home directory:
${user.home}/.m2/settings.xml
Both files are optional. If both files are present, the values in the user home settings file overrides the values in the Maven installation settings file.
You can read more about the Maven settings files in the Maven Settings Reference.
Running Maven
When you have installed Maven and have created a POM file and put the POM file in the root directory of your project, you can run Maven on your project.
Running Maven is done by executing the mvn command from a command prompt. When executing
the mvn command you pass the name of a build life cycle, phase or goal to it, which Maven then executes.
Here is an example:
mvn install
This command executes the build phase called install (part of the default build life cycle),
which builds the project and copies the packaged
JAR file into the local Maven repository. Actually, this command executes all build phases before install
in the build phase sequence, before executing the install build phase.
You can execute multiple build life cycles or phases by passing more than one argument to the mvn command.
Here is an example:
mvn clean install
This command first executes the clean build life cycle, which removes compiled classes from
the Maven output directory, and then it executes the install build phase.
You can also execute a Maven goal (a subpart of a build phase) by passing the build phase and goal name concatenated with a : in between, as parameter to the Maven command. Here is an example:
mvn dependency:copy-dependencies
This command executes the copy-dependencies goal of the dependency build phase.
Maven Directory Structure
Maven has a standard directory structure. If you follow that directory structure for your project, you do not need to specify the directories of your source code, test code etc. in your POM file.
I have covered the Maven directory structure in more detail here: Maven Directory Structure.
Here are the most important directories:
- src
  - main
    - java
    - resources
    - webapp
  - test
    - java
    - resources

- target
The src directory is the root directory of your source code and test code.
The main directory is the root directory for source code related to the
application itself (not test code). The test directory contains the test
source code. The java directories under main and test
contains the Java code for the application itself (under main) and the
Java code for the tests (under test).
The resources directory contains other resources needed by your project. This
could be property files used for internationalization of an application, or something else.
The webapp directory contains your Java web application, if your project
is a web application. The webapp directory will then be the root directory
of the web application. Thus the webapp directory
contains the WEB-INF directory etc.
The target directory is created by Maven. It contains all the compiled
classes, JAR files etc. produced by Maven. When executing the clean
build phase, it is the target directory which is cleaned.
Project Dependencies
Unless your project is small, your project may need external Java APIs or frameworks which are packaged in their own JAR files. These JAR files are needed on the classpath when you compile your project code.
Keeping your project up-to-date with the correct versions of these external JAR files can be a comprehensive task. Each external JAR may again also need other external JAR files etc. Downloading all these external dependencies (JAR files) recursively and making sure that the right versions are downloaded is cumbersome. Especially when your project grows big, and you get more and more external dependencies.
Luckily, Maven has built-in dependency management. You specify in the POM file what external libraries your project depends on, and which version, and then Maven downloads them for you and puts them in your local Maven repository. If any of these external libraries need other libraries, then these other libraries are also downloaded into your local Maven repository.
You specify your project dependencies inside the dependencies element
in the POM file. Here is an example:
<project xmlns="http://maven.apache.org/POM/4.0.0"
         xmlns:xsi="http://www.w3.org/2001/XMLSchema-instance"
         xsi:schemaLocation="http://maven.apache.org/POM/4.0.0
   http://maven.apache.org/xsd/maven-4.0.0.xsd">
    <modelVersion>4.0.0</modelVersion>

    <groupId>com.jenkov.crawler</groupId>
    <artifactId>java-web-crawler</artifactId>
    <version>1.0.0</version>

      <dependencies>

        <dependency>
          <groupId>org.jsoup</groupId>
          <artifactId>jsoup</artifactId>
          <version>1.7.1</version>
        </dependency>

        <dependency>
          <groupId>junit</groupId>
          <artifactId>junit</artifactId>
          <version>4.8.1</version>
          <scope>test</scope>
        </dependency>

      </dependencies>


    <build>
    </build>

</project>
Notice the dependencies element in bold. Inside it are two dependency
elements. Each dependency element describes an external dependency.
Each
dependency is described by its groupId, artifactId and version.
You may remember that this is also how you identified your own project in the beginning of the POM file.
The example above needs the org.jsoup group's jsoup artifact in version 1.7.1,
and the junit group's junit artifact in version 4.8.1.
When this POM file is executed by Maven, the two dependencies will be downloaded from a central Maven repository and put into your local Maven repository. If the dependencies are already found in your local repository, Maven will not download them. Only if the dependencies are missing will they be downloaded into your local repository.
Sometimes a given dependency is not available in the central Maven repository. You can then download the
dependency yourself and put it into your local Maven repository. Remember to put it into a subdirectory
structure matching the groupId, artifactId and version. Replace all
dots (.) with / and separate the groupId, artifactId and version
with / too. Then you have your subdirectory structure.
The two dependencies downloaded by the example above will be put into the following subdirectories:
MAVEN_REPOSITORY_ROOT/junit/junit/4.8.1
MAVEN_REPOSITORY_ROOT/org/jsoup/jsoup/1.7.1
External Dependencies
An external dependency in Maven is a dependency (JAR file) which is not located in
a Maven repository (neither local, central or remote repository). It may be located
somewhere on your local hard disk, for instance in the lib directory
of a webapp, or somewhere else. The word "external" thus means external to the Maven
repository system - not just external to the project. Most dependencies are external to
the project, but few are external to the repository system (not located in a repository).
You configure an external dependency like this:
<dependency>
  <groupId>mydependency</groupId>
  <artifactId>mydependency</artifactId>
  <scope>system</scope>
  <version>1.0</version>
  <systemPath>${basedir}\war\WEB-INF\lib\mydependency.jar</systemPath>
</dependency>
The groupId and artifactId are both set to the name of the dependency.
The name of the API used, that is.
The scope element value is set to system.
The systemPath element is set to point to the location of the JAR
file containing the dependency. The ${basedir} points to the directory where
the POM is located. The rest of the path is relative from that directory.
Snapshot Dependencies
Snapshot dependencies are dependencies (JAR files) which are under development. Instead of constantly updating the version numbers to get the latest version, you can depend on a snapshot version of the project. Snapshot versions are always downloaded into your local repository for every build, even if a matching snapshot version is already located in your local repository. Always downloading the snapshot dependencies assures that you always have the latest version in your local repository, for every build.
You can tell Maven that your project is a snapshot version simply by appending -SNAPSHOT
to the version number in the beginning of the POM (where you also set the groupId and
artifactId). Here is a version element example:
<version>1.0-SNAPSHOT</version>
Notice the -SNAPSHOT appended to the version number.
Depending on a snapshot version is also done by appending the -SNAPSHOT
after the version number when configuring dependencies. Here is an example:
<dependency>
    <groupId>com.jenkov</groupId>
    <artifactId>java-web-crawler</artifactId>
    <version>1.0-SNAPSHOT</version>
</dependency>
The -SNAPSHOT appended to the version number tells Maven that this
is a snapshot version.
You can configure how often Maven shall download snapshot dependencies in the Maven Settings File.
Transitive Dependencies
If your project depends on a dependency, say Dependency ABC, and Dependency ABC itself depends on another dependency, say Dependency XYZ, then your project has a transitive dependency on Dependency XYZ.
Exclude Dependency
Sometimes the direct dependencies of your project may clash with the transitive dependencies of the direct dependencies. For instance, you may be using a JAX-RS implementation which internally uses an older version of the Jackson JSON Toolkit. However, your application may be using a newer version of the Jackson JSON Toolkit. How do you know which of the two versions will be used?
A solution is to specify for the JAX-RS dependency that its dependency on the older version of the Jackson JSON Toolkit should be excluded. This is also referred to as dependency exclusion.
You specify a dependency exclusion inside the declaration of the dependency which transitive dependency you want to exclude. Here is an example of declaring a Maven dependency exclusion:
<dependency>
  <groupId>example.jaxrs</groupId>
  <artifactId>JAX-RS-TOOLKIT</artifactId>
  <version>1.0</version>
  <scope>compile</scope>
  <exclusions>
    <exclusion>
      <groupId>com.fasterxml.jackson.core</groupId>
      <artifactId>jackson-core</artifactId>
    </exclusion>
  </exclusions>
</dependency>
With this dependency exclusion declaration in place, whatever version of the excluded dependency that the dependency containing the exclusion is using, will be ignored during Maven's compilation of the project.
Maven Repositories
Maven repositories are directories of packaged JAR files with extra meta data. The meta data are POM files describing the projects each packaged JAR file belongs to, including what external dependencies each packaged JAR has. It is this meta data that enables Maven to download dependencies of your dependencies recursively, until the whole tree of dependencies is download and put into your local repository.
Maven repositories are covered in more detail in the Maven Introduction to Repositories, but here is a quick overview.
Maven has three types of repository:
- Local repository
- Central repository
- Remote repository
Maven searches these repositories for dependencies in the above sequence. First in the local repository, then in the central repository, and third in remote repositories if specified in the POM.
Here is a diagram illustrating the three repository types and their location:
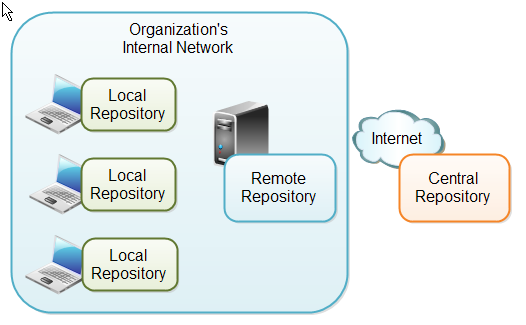 |
| Maven Repository Types and Location. |
Local Repository
A local repository is a directory on the developer's computer. This repository will contain
all the dependencies Maven downloads. The same Maven repository is typically used for several
different projects. Thus Maven only needs to download the dependencies once, even if multiple
projects depends on them (e.g. Junit).
Your own projects can also be built and installed in your local repository, using the
mvn install command. That way your other projects can use the packaged JAR
files of your own projects as external dependencies by specifying them as external dependencies
inside their Maven POM files.
By default Maven puts your local repository inside your user home directory on your
local computer. However, you can change the location of the local repository by
setting the directory inside your Maven settings file. Your Maven settings file
is also located in your user-home/.m2 directory and is called
settings.xml. Here is how you specify another location for your local
repository:
<settings>
    <localRepository>
        d:\data\java\products\maven\repository
    </localRepository>
</settings>
Central Repository
The central Maven repository is a repository provided by the Maven community. By default Maven looks in this central repository for any dependencies needed but not found in your local repository. Maven then downloads these dependencies into your local repository. You need no special configuration to access the central repository.
Remote Repository
A remote repository is a repository on a web server from which Maven can download
dependencies, just like the central repository. A remote repository can be located
anywhere on the internet, or inside a local network.
A remote repository is often used for hosting projects internal to your organization, which are shared by multiple projects. For instance, a common security project might be used across multiple internal projects. This security project should not be accessible to the outside world, and should thus not be hosted in the public, central Maven repository. Instead it can be hosted in an internal remote repository.
Dependencies found in a remote repository are also downloaded and put into your local repository by Maven.
You can configure a remote repository in the POM file. Put the following
XML elements right after the <dependencies> element:
<repositories>
   <repository>
       <id>jenkov.code</id>
       <url>http://maven.jenkov.com/maven2/lib</url>
   </repository>
</repositories>
Maven Build Life Cycles, Phases and Goals
When Maven builds a software project it follows a build life cycle. The build life cycle is divided into build phases, and the build phases are divided into build goals. Maven build life cycles, build phases and goals are described in more detail in the Maven Introduction to Build Phases, but here I will give you a quick overview.
Build Life Cycles
Maven has 3 built-in build life cycles. These are:
- default
- clean
- site
Each of these build life cycles takes care of a different aspect of building a software project. Thus, each of these build life cycles are executed independently of each other. You can get Maven to execute more than one build life cycle, but they will be executed in sequence, separately from each other, as if you had executed two separate Maven commands.
The default life cycle handles everything related to compiling and
packaging your project. The clean life cycle handles everything
related to removing temporary files from the output directory, including generated
source files, compiled classes, previous JAR files etc. The site
life cycle handles everything related to generating documentation for your project.
In fact, site can generate a complete website with documentation for
your project.
Build Phases
Each build life cycle is divided into a sequence of build phases, and the build
phases are again subdivided into goals. Thus, the total build process is a sequence
of build life cycle(s), build phases and goals.
You can execute either a whole build life cycle like clean or site,
a build phase like install which is part of the default build life cycle,
or a build goal like dependency:copy-dependencies. Note: You cannot execute the
default life cycle directly. You have to specify a build phase or goal inside the
default life cycle.
When you
execute a build phase, all build phases before that build phase in this standard phase sequence
are executed. Thus, executing the install build phase really means executing
all build phases before the install phase, and then execute the install
phase after that.
The default life cycle is of most interest since that is what builds the code.
Since you cannot execute the default life cycle directly, you need to execute
a build phase or goal from the default life cycle. The default life cycle
has an extensive sequence of build phases and goals, ,so I will not describe them all here.
The most commonly used build phases are:
| Build Phase | Description |
validate |
Validates that the project is correct and all necessary information is available. This also makes sure the dependencies are downloaded. |
compile |
Compiles the source code of the project. |
test |
Runs the tests against the compiled source code using a suitable unit testing framework. These tests should not require the code be packaged or deployed. |
package |
Packs the compiled code in its distributable format, such as a JAR. |
install |
Install the package into the local repository, for use as a dependency in other projects locally. |
deploy |
Copies the final package to the remote repository for sharing with other developers and projects. |
You execute one of these build phases by passing its name to the mvn command. Here
is an example:
mvn package
This example executes the package build phase, and thus also all build phases
before it in Maven's predefined build phase sequence.
If the standard Maven build phases and goals are not enough to build your project, you can create Maven plugins to add the extra build functionality you need.
Build Goals
Build goals are the finest steps in the Maven build process. A goal can be bound to one or
more build phases, or to none at all. If a goal is not bound to any build phase, you can
only execute it by passing the goals name to the mvn command. If a goal is
bound to multiple build phases, that goal will get executed during each of the build phases
it is bound to.
Maven Build Profiles
Maven build profiles enable you to build your project using different configurations. Instead of creating two separate POM files, you can just specify a profile with the different build configuration, and build your project with this build profile when needed.
You can read the full story about build profiles in the Maven POM reference under Profiles. Here I will give you a quick overview though.
Maven build profiles are specified inside the POM file, inside the profiles element. Each build profile
is nested inside a profile element. Here is an example:
<project xmlns="http://maven.apache.org/POM/4.0.0"
         xmlns:xsi="http://www.w3.org/2001/XMLSchema-instance"
         xsi:schemaLocation="http://maven.apache.org/POM/4.0.0
   http://maven.apache.org/xsd/maven-4.0.0.xsd">
  <modelVersion>4.0.0</modelVersion>

  <groupId>com.jenkov.crawler</groupId>
  <artifactId>java-web-crawler</artifactId>
  <version>1.0.0</version>

  <profiles>
      <profile>
          <id>test</id>
          <activation>...</activation>
          <build>...</build>
          <modules>...</modules>
          <repositories>...</repositories>
          <pluginRepositories>...</pluginRepositories>
          <dependencies>...</dependencies>
          <reporting>...</reporting>
          <dependencyManagement>...</dependencyManagement>
          <distributionManagement>...</distributionManagement>
      </profile>
  </profiles>

</project>
A build profile describes what changes should be made to the POM file when executing under that
build profile. This could be changing the applications configuration file to use etc.
The elements inside the profile element will override the values of the
elements with the same name further up in the POM.
Inside the profile element you can see a activation element. This
element describes the condition that triggers this build profile to be used. One way to
choose what profile is being executed is in the settings.xml file. There you
can set the active profile. Another way is to add -P profile-name to the Maven command
line. See the profile documentation for more information.
Maven Plugins
Maven plugins enable you to add your own actions to the build process. You do so by creating a simple Java class that extends a special Maven class, and then create a POM for the project. The plugin should be located in its own project.
To keep this tutorial short, I will refer to the Maven Plugin Developers Centre for more information about developing plugins.
| Tweet | |
Jakob Jenkov | |


