RSync - Overview
Jakob Jenkov |
This text will give you an overview of how RSync works. The purpose of this text is not to give you every detail, but only to provide an overview of RSync. Each step / part is explained in more detail in later texts.
Imagine you have a file on your local hard drive, and a copy of that file on a remote server. Now you make a change to the file on your local hard drive. You then want the copy on the remote server to be equal to the copy on your local hard drive. Since you only made a small change to the file, you don't want to send the complete file across the network. You only want to send the changes. This is what RSync does.
Here is a diagram showing the purpose of RSync:
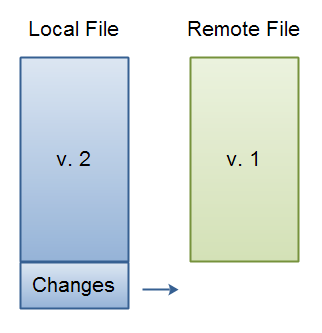 |
| Local and Remote File Versions |
Detecting Changes
So how does RSync detect changes without having both versions of the file available on the same machine, to do a traditional DIFF?
Here is how:
- The computer holding the newest version of the file is here called NEW, and the computer holding the oldest
file is called OLD.
- OLD divides the oldest version of the file into blocks of, say 1024 or 2048 bytes. The file is not divided on the
disk. It's just something OLD does logically, internally in the memory.
- For each block OLD calculates a checksum.
- The list of block checksums are sent to NEW.
- NEW searches the newest version of the file for blocks
of data that has the same checksum as those found in the old version of the file.
This is done by fist calculating the checsum for the very first block of data (1024 or 2048 bytes).
If this checksum does not match any checksum in the old file, NEW moves 1 byte down the new file and
calculates the checsum for this 1024 checksum. NEW thus calculates checksums for every possible 1024
(or 2048) byte block in the new file, to search for matches to blocks in the old file.
-
If NEW finds a 1024 byte block with the same checksum as one of the checksums received from OLD, then it
considers that block to exist in the old version. It doesn't matter if the sequence of blocks is not the
same as in the old version. NEW now skips to the end of this block and continues searching for checksum
matches from there.
-
NEW will thus find X blocks of data matching checksums in the old file. This is the data that has not changed
between the old and the new version of the file. In between these blocks will be
data that was not part of a 1024 block that matched a checksum in the old file. This data is CHANGES,
either new or modified data.
- NEW sends back instructions to OLD on how to create a copy of the newest version of the file.
NEW does this by sending a list of block references in the old file for the sections of the newest file
that has not changed. For the parts that has changed NEW sends back the changed data in full.
- OLD receives the list of block references and literal data (the changes), and from the old file and the literal data, constructs the new version of the file.
Here are three diagrams illustrating different progressions of the process:
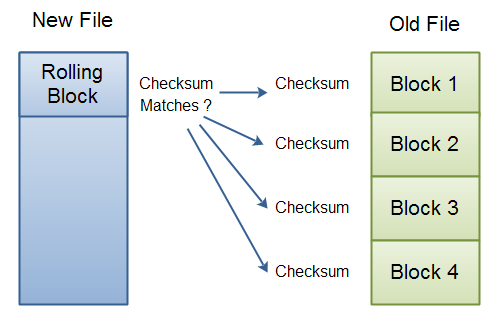 |
| RSync: Block checkums for old file received, and rolling checksum match in new file now begins. |
 |
| RSync: Halfway through detecting the differences between the new and the old version of the file. |
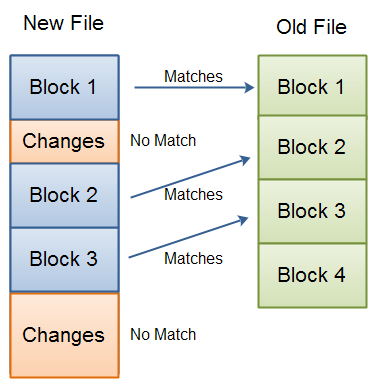 |
| RSync: Difference detection completed. Three blocks in the new file matched blocks in the old file. The rest is changed or new data. |
| Tweet | |
Jakob Jenkov | |


