Java Packages
Jakob Jenkov |
Java packages are a mechanism to group Java classes that are related to each other, into the same "group" (package). When a Java project grows bigger, for instance an app or API, it is useful to split the code into multiple Java classes, and the classes into multiple Java packages. When you divide classes into multiple Java packages, it becomes easier to figure out where a certain class you are looking for is.
A Java package is like a directory in a file system. In fact, on the disk a package is a directory. All Java source and class files of classes belonging to the same package are located in the same directory.
Java packages can contain subpackages. Java packages can thus make up what is called a package structure. A Java package structure is like a directory structure. Its a tree of packages, subpackages and classes inside these classes. A Java package structure is indeed organized as directories on your hard drive, or as directories inside a zip file (JAR files).
Here is a screenshot of an example Java package structure:
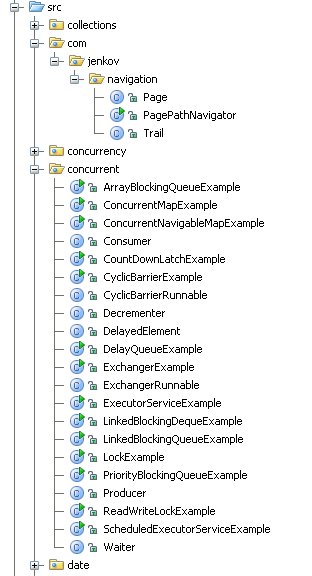 |
| An example Java package structure. |
At the top you see a directory called "src". This is the source root directory. It is not a Java package itself. Inside this directory, all subdirectories correspond to Java packages. Thus, "collections", "com", "concurrency" etc. are all Java packages (which are also directories on the disk). In the screenshot above the Java packages are illustrated with a folder icon.
I have expanded two of the sublevel Java packages, so you can see the classes inside. The classes are illustrated using a little blue circle with a C inside, in the screenshot above.
The full path of a subpackage is its name, with all ancestor package names in front of it, separated by dots. For instance, the full path of "navigation" subpackage is:
com.jenkov.navigation
Similarly, the fully qualified name of a Java class includes its package name. For instance, the full qualified name of the "Page" class, is:
com.jenkov.navigation.Page
Creating a Java Package Structure
To create a Java package you must first create a source root directory on your hard disk. The root directory is not itself part of the package structure. The root directory contains all the Java sources that need to go into your package structure.
Once you have created a source root directory you can start adding subdirectories to it. Each subdirectory corresponds to a Java package. You can add subdirectories inside subdirectories to create a deeper package structure.
Adding Classes to Packages
In order to put add Java classes to packages, you must do two things:
- Put the Java source file inside a directory matching the Java package you want to put the class in.
- Declare that class as part of the package.
Putting the Java source file inside a directory structure that matches the package structure, is pretty straightforward. Just create a source root directory, and inside that, create directories for each package and subpackage recursively. Put the class files into the directory matching the package you want to add it to.
When you have put your Java source file into the correct directory (matching the package the class should belong to), you have to declare inside that class file, that it belongs to that Java package. Here is how you declare the package inside a Java source file:
package com.jenkov.navigation;

public class Page {
    ...
}
The first line in the code above (in bold) is what declares the class Page as belonging to
the package com.jenkov.navigation.
Java Package Naming Conventions
Java packages are always written in lowercase letters. Not like Java classes, where the first letter is usually a capital letter.
To avoid creating packages with the same names as other public Java packages it is recommended that you start
your package hierarchy with the reverse domain name of your company. For instance, since the domain name of my
company is jenkov.com I should start with a package structure called com.jenkov.
In other words, a top level package named com with a subpackage inside called jenkov.
Importing Classes From Other Java Packages
If a class A needs to use the class B, you must reference class B inside class A. If class A and B are located in the same Java package, the Java compiler will accept references between the two classes. Here is an example of that:
public class B {

    public void doIt() {
        // do something...
    }
}
public class A {

    public static void main(String[] args){
        B theBObj = new B();

        theBObj.doIt();
    }
}
If the classes A and B are located in the same Java package, there is no problem with the code above. However, if class A and B are located in different Java packages, then class A must import class B in order to use it. Here is how that could look:
import anotherpackage.B;

public class A {

    public static void main(String[] args){
        B theBObj = new B();

        theBObj.doIt();
    }
}
It is the first line in the example that imports class B. The example assumes that class B is located in a
Java package named anotherpackage.
If class B had been located in a subpackage of anotherpackage
you would have to list the full package and subpackage path to class B. For instance, if class B was located in
package anotherpackage.util then the import statement would have looked like this:
import anotherpackage.util.B;
Importing All Classes From Another Package
If you need to use a lot of classes from a certain Java package, importing them one at a time results in a lot
of import statements. It is possible to import all classes of a package using the * character instead
of a class name. Here is how such an import statement looks:
import anotherpackage.util.*;
Using Classes via Their Fully Qualified Class Name
It is possible to use a class from another package without importing it with an import statement.
You can write the fully qualified class name instead of just the name of the class itself. The fully qualified
class name consists of the full package path down to the subclass containing the class, and also including the
class name itself. The fully qualified class name is also what you would write in an import statement. For instance:
anotherpackage.util.TimeUtil;
You could use this fully qualified class name to reference the TimeUtil class inside another class, like this:
public class A {

    public static void main(String[] args){

        anotherpackage.util.TimeUtil timeUtil =
            new anotherpackage.util.TimeUtil();

        timeUtil.startTimer();
    }
}
How to Divide Your Classes Into Packages
You might be wondering how you decide on what Java packages to create, and how to divide your classes into these packages. There is no official standard for that, but there are two commonly used methods.
Divide by Layer
The first method is to divide classes after what "layer" of the application they belong to. For instance, your
application may have a database layer. Then you would create a database package. All classes involved
in communication with the database would then be located in the database package.
Divide by Application Functionality
The second method is to divide your classes based on what part of the application functionality they belong to.
Thus, if your application has a functionality area which calculates pensions, you might create a Java package
named pension . All classes involved in one way or another in the pension calculations would go into
that package (or subpackages, if the number of classes in pension grow large).
Combined with my domain name, the package structure for a pension package would be:
com.jenkov.pension
A total of three packages, two nested inside other packages (jenkov inside com, and
pension inside jenkov).
The "divide by application functionality" method of dividing classes into Java packages tends to work better than "divide by layer", as your application grows in number of classes. Instead of having a fixed number of layer packages which keep growing in number of classes, you get a growing number of application functionality packages with a smaller number of classes inside. The "divide by application functionality" is the method I use, and which most of my colleagues are using too.
Built-in Java Packages
The Java platform comes with a lot of built-in Java packages. These packages contain classes for all kinds of purposes that programmers often need, like reading and writing files from the local hard disk, sending and receiving data over networks and the internet, connecting to databases, and many, many other things. I have covered many of these packages (APIs) in separate tutorials. If you go the frontpage of my tutorial website, you can see a list of what I have covered so far:
| Tweet | |
Jakob Jenkov | |


