JavaFX GridPane
Jakob Jenkov |
A JavaFX GridPane is a layout component which lays out its child components in a grid. The size of the cells in the grid depends on the components displayed in the GridPane, but there are some rules. All cells in the same row will have the same height, and all cells in the same column will have the same width. Different rows can have different heights and different columns can have different widths.
The JavaFX GridPane is different from the TilePane in that a GridPane
allows different size of cells, whereas a TilePane makes all tiles the same size.
The number of rows and columns in a GridPane depends on the components added to it. When you
add a component to a GridPane you tell in what cell (row, column) the component should
be inserted, and how many rows and columns the component should span.
The JavaFX GridPane layout component is represented by the class javafx.scene.layout.GridPane
Creating a GridPane
You create a JavaFX GridPane via its constructor. Here is a JavaFX GridPane
instantiation example:
GridPane gridPane = new GridPane();
Adding Children to a GridPane
You can add children to a JavaFX GridPane in several ways. The easiest way is to use the add()
of the GridPane. Here is an example of adding 6 buttons to a GridPane:
Button button1 = new Button("Button 1");
Button button2 = new Button("Button 2");
Button button3 = new Button("Button 3");
Button button4 = new Button("Button 4");
Button button5 = new Button("Button 5");
Button button6 = new Button("Button 6");

GridPane gridPane = new GridPane();

gridPane.add(button1, 0, 0, 1, 1);
gridPane.add(button2, 1, 0, 1, 1);
gridPane.add(button3, 2, 0, 1, 1);
gridPane.add(button4, 0, 1, 1, 1);
gridPane.add(button5, 1, 1, 1, 1);
gridPane.add(button6, 2, 1, 1, 1);
The first parameter of the add() method is the component (node) to add to the GridPane.
The second and third parameter of the add() method is the column index and row index of the cell
in which the component should be displayed. Column and row indexes start from 0.
The fourth and fifth parameter of the add() method are the oclumn span and row span of the
component, meaning how many rows and columns the component should extend to. Column span and row span
works similarly to colspan and rowspan in an HTML table.
Adding a GridPane to the Scene Graph
To make a JavaFX GridPane visible you must add it to the JavaFX scene graph. To do so you must add
the GridPane instance to a Scene object, or add the GridPane to a
layout component which is added to a Scene object.
Here is an example of adding a JavaFX GridPane to the scene graph:
package com.jenkov.javafx.layouts;

import javafx.application.Application;
import javafx.scene.Scene;
import javafx.scene.control.Button;
import javafx.scene.layout.GridPane;
import javafx.stage.Stage;


public class GridPaneExperiments extends Application  {


    @Override
    public void start(Stage primaryStage) throws Exception {
        primaryStage.setTitle("GridPane Experiment");

        Button button1 = new Button("Button 1");
        Button button2 = new Button("Button 2");
        Button button3 = new Button("Button 3");
        Button button4 = new Button("Button 4");
        Button button5 = new Button("Button 5");
        Button button6 = new Button("Button 6");

        GridPane gridPane = new GridPane();

        gridPane.add(button1, 0, 0, 1, 1);
        gridPane.add(button2, 1, 0, 1, 1);
        gridPane.add(button3, 2, 0, 1, 1);
        gridPane.add(button4, 0, 1, 1, 1);
        gridPane.add(button5, 1, 1, 1, 1);
        gridPane.add(button6, 2, 1, 1, 1);

        Scene scene = new Scene(gridPane, 240, 100);
        primaryStage.setScene(scene);
        primaryStage.show();
    }

    public static void main(String[] args) {
        Application.launch(args);
    }
}
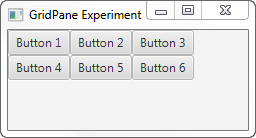
The application resulting from this application looks like the following screen shots.

Spanning Multiple Rows and Columns
To see how to make a component span multiple columns and rows, look at this modification of the 6 buttons
added to the GridPane:
gridPane.add(button1, 0, 0, 2, 2);

gridPane.add(button2, 2, 0, 1, 1);
gridPane.add(button3, 2, 1, 1, 1);
gridPane.add(button4, 0, 2, 1, 1);
gridPane.add(button5, 1, 2, 1, 1);
gridPane.add(button6, 2, 2, 1, 1);
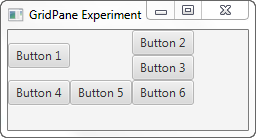
Notice how the first button added is given a column span and row span of 2. Notice how the rest of the buttons are added outside of the top left 2 x 2 columns. The layout resulting from these settings looks like this:

Horizontal and Vertical Spacing
You can set the horizontal and vertical spacing between the components shown inside a JavaFX GridPane
using its setHGap() and setVGap() methods. Here is an example that shows how to set
the horizontal and vertical gap between components in a GridPane :
gridPane.setHgap(10);
gridPane.setVgap(10);
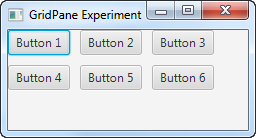
When added to the example earlier, the resulting application would look like this:

Notice the horizontal and vertical gaps between the buttons. If there were no gaps set on the GridPane
the buttons would have been positioned next to each other.
| Tweet | |
Jakob Jenkov | |


