JavaFX TableView
- Classes Related to TableView
- JavaFX TableView Example
- Create a TableView
- Add TableColumn to the TableView
- Add Data to TableView
- Using Maps as Data Items
- Set Placeholder When No Rows to Display
- TableView Selection Model
- Nested Columns
- Hide Columns
- Reorder Columns
- Sorting Rows
- Virtualized Cell Rendering
- Custom Cell Rendering
- Editable TableView
Jakob Jenkov |
The JavaFX TableView enables you to display table views inside your JavaFX applications.
The JavaFX TableView is represented by the class javafx.scene.control.TableView .
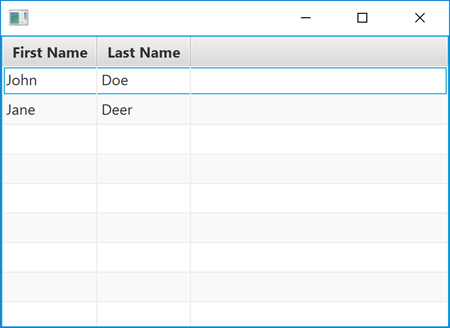
Here is a screenshot of a JavaFX TableView:

Classes Related to TableView
The JavaFX TableView class uses a set of related classes to do its job. These classes are:
- TableColumn
- TableRow
- TableCell
- TablePosition
- TableViewFocusModel
- TableViewSelectionModel
What exactly these classes do will be covered in the corresponding sections later in this tutorial.
JavaFX TableView Example
Here is a full, but simple JavaFX TableView code example:
import javafx.application.Application;
import javafx.scene.Scene;
import javafx.scene.control.TableColumn;
import javafx.scene.control.TableView;
import javafx.scene.control.cell.PropertyValueFactory;
import javafx.scene.layout.VBox;
import javafx.stage.Stage;

public class TableViewExample extends Application {

  public static void main(String[] args) {
    launch(args);
  }

  @Override
  public void start(Stage primaryStage) {

    TableView tableView = new TableView();

    TableColumn<Person, String> column1 =
    new TableColumn<>("First Name");

    column1.setCellValueFactory(
        new PropertyValueFactory<>("firstName"));


    TableColumn<Person, String> column2 =
    new TableColumn<>("Last Name");

    column2.setCellValueFactory(
        new PropertyValueFactory<>("lastName"));


    tableView.getColumns().add(column1);
    tableView.getColumns().add(column2);

    tableView.getItems().add(
      new Person("John", "Doe"));
    tableView.getItems().add(
      new Person("Jane", "Deer"));

    VBox vbox = new VBox(tableView);

    Scene scene = new Scene(vbox);

    primaryStage.setScene(scene);

    primaryStage.show();
  }

}
Here is the Person class used in this example:
public class Person {

    private String firstName = null;
    private String lastName = null;

    public Person() {
    }

    public Person(String firstName, String lastName) {
        this.firstName = firstName;
        this.lastName = lastName;
    }

    public String getFirstName() {
        return firstName;
    }

    public void setFirstName(String firstName) {
        this.firstName = firstName;
    }

    public String getLastName() {
        return lastName;
    }

    public void setLastName(String lastName) {
        this.lastName = lastName;
    }
}
Create a TableView
In order to use a JavaFX TableView component you must first create a TableView instance.
Here is an example of creating a JavaFX TableView instance:
TableView tableView = new TableView();
Add TableColumn to the TableView
Having created a TableView you need to add one or more TableColumn instances to the
TableView instance. A TableColumn represents a vertical column of values. Each value
is displayed on its own row, and is typically extracted from the list of objects being displayed in the
TableView. Here is an example of adding two TableColumn instances to a
JavaFX TableView instance:
TableView tableView = new TableView();

TableColumn<Person, String> firstNameColumn =
    TableColumn<>("First Name");
firstNameColumn.setCellValueFactory(
    new PropertyValueFactory<>("firstName"));

TableColumn<Person, String> lastNameColumn =
    new TableColumn<>("Last Name");
lastNameColumn.setCellValueFactory(
    new PropertyValueFactory<>("lastName"));
Notice the Java String parameter passed to the constructor of the
TableColumn class. This string will be displayed as the column header above the column.
You can see an example of such a column header title in the screenshot at the top of this page.
TableColumn Cell Value Factory
A TableColumn must have a cell value factory set on it. The cell value factory
extracts the value to be displayed in each cell (on each row) in the column. In the example above
a PropertyValueFactory is used. The PropertyValueFactory factory can extract a property value
(field value) from a Java object. The name of the property is passed as a parameter to the
PropertyValueFactory constructor, like this:
PropertyValueFactory factory =
    new PropertyValueFactory<>("firstName");
The property name firstName will match the getter getter method getFirstName()
of the Person objects which contain the values are displayed on each row.
In the example shown earlier, a second PropertyValueFactory is set on the second
TableColumn instance. The property name passed to the second PropertyValueFactory
is lastName, which will match the getter method getLastName() of the Person
class.
Add Data to TableView
Once you have added TableColumn instances to the JavaFX TableView, you can add
the data to be displayed to the TableView. The data is typically contained in a list of
regular Java objects (POJOs). Here is an example of adding two Person objects (class shown earlier
in this JavaFX TableView tutorial) to a TableView :
tableView.getItems().add(new Person("John", "Doe"));
tableView.getItems().add(new Person("Jane", "Deer"));
Using Maps as Data Items
It is possible to use standard Java Map instances for your data items instead of creating a specific class for them (as the Person class in earlier examples).
To use a Map as a data item the TableColumn instances attached to the TableView need to use a special cell value factory called a MapValueFactory. Here is an example of how configuring two TableColumn instances to display first name and last name extracted from a Map looks:
TableColumn<Map, String> firstNameColumn = new TableColumn<>("firstName");
firstNameColumn.setCellValueFactory(new MapValueFactory<>("firstName"));

TableColumn<Map, String> lastNameColumn = new TableColumn<>("lastName");
lastNameColumn.setCellValueFactory(new MapValueFactory<>("lastName"));
With these TableColumn configurations you can use Map instances as data items. Here is a full example showing how to use Map instances as data items:
TableView tableView = new TableView();

TableColumn<Map, String> firstNameColumn = new TableColumn<>("firstName");
firstNameColumn.setCellValueFactory(new MapValueFactory<>("firstName"));

TableColumn<Map, String> lastNameColumn = new TableColumn<>("lastName");
lastNameColumn.setCellValueFactory(new MapValueFactory<>("lastName"));

tableView.getColumns().add(firstNameColumn);
tableView.getColumns().add(lastNameColumn);


ObservableList<Map<String, Object>> items =
    FXCollections.<Map<String, Object>>observableArrayList();

Map<String, Object> item1 = new HashMap<>();
item1.put("firstName", "Randall");
item1.put("lastName" , "Kovic");

items.add(item1);

Map<String, Object> item2 = new HashMap<>();
item2.put("firstName", "Irmelin");
item2.put("lastName" , "Satoshi");

items.add(item2);

tableView.getItems().addAll(items);
Set Placeholder When No Rows to Display
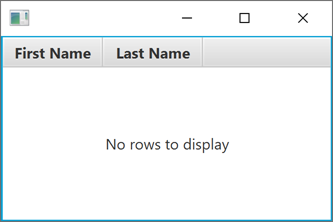
You can set a placeholder to be displayed when the JavaFX TableView has no rows to display.
The placeholder must be an instance of the JavaFX Node class, which most (if not all) JavaFX controls
are. Thus, you can use an JavaFX ImageView or
JavaFX Label as placeholder. Here is an example
of using a Label as placeholder in a JavaFX TableView :
tableView.setPlaceholder(
    new Label("No rows to display"));
And here is how the corresponding TableView looks with the placeholder displayed:

TableView Selection Model
The JavaFX TableView component has an internal SelectionModel which is used to either read what rows and / or cells the user has selected, or to select rows and cells programmatically. In the following sections I will take a closer look at the JavaFX TableView SelectionModel.
Obtain TableView SelectionModel Instance
To obtain the JavaFX TableView SelectionModel you must call its getSelectionModel()
method. Here is an example of obtaining the SelectionModel from a JavaFX TableView:
TableViewSelectionModel selectionModel =
    tableView.getSelectionModel();
The TableViewSelectionModel class can have a generic type set on it. Typically that type will be the same as was used for the data displayed in the TableView. Here is an example of declaring a generic type on the TableViewSelectionModel when obtaining it:
TableViewSelectionModel<Person> selectionModel =
    tableView.getSelectionModel();
Set Selection Mode
You can set the selection mode of the TableView TableViewSelectionModel using its
setSelectionMode() method. You can choose whether it should be possible to select only one row,
or multiple rows, or even individual cells. Here is an example of setting the selection mode of a
TableViewSelectionModel:
// set selection mode to only 1 row
selectionModel.setSelectionMode(
    SelectionMode.SINGLE);

// set selection mode to multiple rows
selectionModel.setSelectionMode(
    SelectionMode.MULTIPLE);
The first line sets the selection mode to only allow a single row to be selected at a time. This is the default setting of the TableViewSelectionModel, by the way.
The second line sets the selection mode to allow the selection of multiple rows. The user will need to hold down the SHIFT or CTRL key while selecting rows to select more than one row.
Get Selected Rows
To obtain a list of the selected row items of a JavaFX TableView, you call the SelectionModel getSelectedItems()
method. The list returned is read-only. Here is an example of obtaining a list of the selected rows from a JavaFX TableView SelectionModel:
ObservableList selectedItems =
    selectionModel.getSelectedItems();
If the TableViewSelectionModel has a generic type set on it, the ObservableList returned from
the getSelectedItems() will have the same generic type. Here is an example:
ObservableList<Person> selectedItems =
    selectionModel.getSelectedItems();
Get Selected Indices
You can also just obtain a list of the indices of the selected rows, instead of the selected items themselves. Here is an example of obtaining a list of the indices of selected rows from a TableViewSelectionModel:
ObservableList<Integer> selectedIndices =
    selectionModel.getSelectedIndices();
Clear Selection
You can clear all selected rows and cells using the TableViewSelectionModel clearSelection() method.
Here is an example of clearing all selected rows or cells of a TableView via the TableViewSelectionModel
clearSelection() method:
selectionModel.clearSelection();
Listening for Selection Changes
It is possible to listen for selection changes in the TableViewSelectionModel. To do so, you must attach a listener
to one of the ObservableList's returned by either getSelectedItems() or getSelectedIndices().
Which of the two lists you should use depends on whether you need to obtain the selected items or selected indices
when selection changes. Here is an example of attaching a change listener to the the ObservableList returned by
getSelectedItems():
ObservableList<Person> selectedItems =
    selectionModel.getSelectedItems();

selectedItems.addListener(
  new ListChangeListener<Person>() {
    @Override
    public void onChanged(
      Change<? extends Person> change) {
        System.out.println(
          "Selection changed: " + change.getList());
      }
})
Select Rows Programmatically
It is possible to select rows programmatically in a JavaFX TableView. You do so via the TableViewSelectionModel
object's many selection methods. To select a row with a specific index you can use the select(int)
method. Here is an example of selecting a single row with a given index in a JavaFX TableView:
selectionModel.select(1);
This example selects the row with index 1. Remember that row indices starts from 0 .
Nested Columns
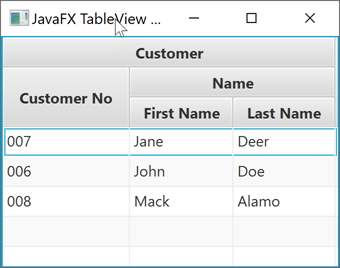
The JavaFX TableView supports nesting of the TableColumn instances you add to it. By nesting columns is simply meant that a table column named "Customer" can be subdivided into two nested columns - e.g. "Customer No" and "Name". And the "Name" column can be subdivided again into "First Name" and "Last Name". Here is a JavaFX TableView nested column example showing that:

The TableColumn instances lowest in the nesting levels are called leaf columns. Only leaf columns can show data. Thus, you only add cell value factories to the leaf TableColumn instances. The TableColumn instances higher up in the nesting levels are primarily there as a visual effect.
Here is the code for the above JavaFX TableView nested column example:
TableView tableView = new TableView();

TableColumn<Customer, String> customer   =
    new TableColumn<>("Customer");
TableColumn<Customer, String> customerId =
    new TableColumn<>("Customer No");
TableColumn<Customer, String> name       =
    new TableColumn<>("Name");
TableColumn<Customer, String> firstName  =
    new TableColumn<>("First Name");
TableColumn<Customer, String> lastName   =
    new TableColumn<>("Last Name");

name     .getColumns().addAll(firstName, lastName);
customer .getColumns().addAll(customerId, name);
tableView.getColumns().addAll(customer);

customerId.setCellValueFactory(
    new PropertyValueFactory<>("customerNo"));
firstName .setCellValueFactory(
    new PropertyValueFactory<>("firstName"));
lastName  .setCellValueFactory(
    new PropertyValueFactory<>("lastName"));

tableView.getItems().add(
    new Customer("007", "Jane", "Deer"));
tableView.getItems().add(
    new Customer("006", "John", "Doe"));
tableView.getItems().add(
    new Customer("008", "Mack", "Alamo"));
Visible Leaf Columns
The JavaFX TableView class has a method called c which can return a visible
leaf column (TableColumn) of the TableView. You pass the index of the visible leaf column to get as parameter
to the getVisibleLeafColumn() method. Here is an example of obtaining the second (index 1) visible leaf
column from a JavaFX TableView:
TableColumn<String, Customer> leafColumn =
    tableView.getVisibleLeafColumn(1);
If the above code was executed against the TableView configured in the example in the previous section, the TableColumn returned would be the "First Name" TableColumn.
You can also obtain all visible leaf columns via the TableView getVisibleLeafColumns() .
Hide Columns
The JavaFX TableView enaables you to hide a TableColumn by calling the TableColumn setVisible() passing
false as parameter. Here is an example of hiding a TableColumn:
tableColumn.setVisible(false);
To show a hidden column again, simply call setVisible() with true as parameter value.
Here is an example of showing a TableColumn:
tableColumn.setVisible(true);
Reorder Columns
The JavaFX TableView enables you to reorder its columns. There are two ways you can recorder its columns.
The first method is to drag a column to a different horizontal position inside the TableView. This is done by the end user - not the developer.
The second method is to change the order of the TableColumn instances in the ObservableList returned by
the TableView getColumns() method. This is done programmatically. Here is an example of
removing the first column and adding it again as the last column of the TableView:
tableView.getColumns().add(
    tableView.getColumns().remove(0));
Sorting Rows
The JavaFX TableView enables you to sort the rows in the TableView. There are two ways rows can be sorted.
The first way is for the user to click on the TableColumn header cell (where the column title is displayed). This will sort the rows in the TableView after the values of that column. If the user clicks on the same TableColumn cell one more time, the sort order is reversed. And if the user clicks a third time, the sorting on that column is disabled again.
The second way to sort the rows of a TableView is programmatic. You can set the sort order (ascending or descending), set a custom Comparator to compare the values of a TableColumn, set a custom sort icon to be displayed, and even disable sorting completely for a given TableColumn. These options will be explained in more detail below.
Sort Type
You can specify which sort type you want the column to use using the TableColumn setSortType() method.
You can set the sort type to either ascending or descending. Here are two examples that show how to set both
sort types:
tableColumn.setSortType(TableColumn.SortType.ASCENDING);

tableColumn.setSortType(TableColumn.SortType.DESCENDING);
Disable Sorting for a Column
It is possible to complete disable sorting for a given TableColumn. You do so via the TableColumn
setSortable() method. Here is an example of disabling sorting for a given TableColumn:
tableColumn.setSortable(false);
To re-enable sorting for the TableColumn, simply call setSortable() with the value true
as parameter - like this:
tableColumn.setSortable(false);
Column Custom Comparator
You can set a custom Comparator interface implementation on a TableColumn. This Comparator implementation will
determine how values displayed in that column will get sorted. You set a Comparator on a TableColumn via its
setComparator() method. Here is an example of setting a custom Comparator on a TableColumn:
Comparator<String> columnComparator =
    (String v1, String v2) -> {

  return v1.toLowerCase().compareTo(
        v2.toLowerCase());

};

tableColumn.setComparator(columnComparator);
This example first creates a Comparator implementation that compares String objects in their lowercase forms. Then it sets this Comparator on a TableColumn. This Comparator will then determine the sort order of values displayed in that column.
Column Default Comparator
The TableColumn has a default Comparator set on it which can perform some intelligent form of default sorting for you. Sometimes that default Comparator is enough. Here is how the default Comparator compares two values displayed inside the same column:
- Checks for
nullvalues. Anullvalue is considered less than a non-null value. If both values arenullthey are considered equal. -
If the first value is an object implementing the Comparable interface, then the default Comparator will return
value1.compareTo(value2). - If rule 1 and 2 did not apply to the values - the default Comparator converts the two values into Strings
using their
.toString()methods, and compares these.
Column Sort Node
The TableColumn class uses a "sort Node" to display the type of sorting currently being applied to that column. The sort Node is displayed inside the column header. The default sort Node is an arrow-like triangle.
You can change the sort Node for a TableColumn via its setSortNode() method, passing a JavaFX Node
to be used as sort Node. Here is an example of setting an ImageView as sort Node on a TableColumn:
FileInputStream input = new FileInputStream("images/sort-image.png");
Image image = new Image(input);
ImageView sortImage = new ImageView(image);

tableColumn.setSortNode(sortImage);
Note: The default sort Node used by the TableColumn is rotated 180 degrees when the sort type changes from ascending to descending. However, this rotation does not seem to happen for a custom sort Node. You will probably have to manage the change of sort Node yourself when the sort type is changed.
Column Sort Order
The JavaFX TableView enables you to specify the default sort order of a TableView. The items in the TableView will be sorted according to this order - until the user clicks some TableColumn headers and changes the sort order.
The default sort order consists of an ObservableList of TableColumn instances. Items in the TableView will be sorted after the sorting set on the first TableColumn in this list. If the values of the first TableColumn are equal, the items will be sorted accordinng to the sorting set on the second TableColumn, and if they are equal then the third TableColumn etc.
Here is an example of setting the default sort order:
tableView.getSortOrder().addAll(lastNameColumn, firstNameColumn);
This example sets the sort order to lastNameColumn first, and then firstNameColumn second.
Note: I am having a bit of challenges seeing the sort order reflected correctly in the items displayed in the TableView when I run my examples - but something happens though. You might have to play a bit with this feature to get it to do as you want!
Trigger Sorting Manually
The JavaFX TableView control contains a method named sort() which when called will trigger sorting
of the items in the TableView. Here is an example of caling the TableView sort() method:
tableView.sort();
Sort Events
The JavaFX TableView fires a sort event just before sorting of the items is carried out. You can listen for
sort events using the TableView setOnSort() method, passing an EventHandler interface implementation
as parameter. Here is an example of listening for sort events on a JavaFX TableView:
tableView.setOnSort((event) -> {
    System.out.println("Sorting items");
});
By the way, if the event listener calls event.consume() - then the sorting will be canceled.
Here is how that could look:
tableView.setOnSort((event) -> {
    event.consume();
});
Disable Sorting for TableView
You can disable sorting for the whole TableView either by listening for sort events and consume them (call event.consume() ) or by disabling sorting on all TableColumn instances. There are other ways to disable sorting for the whole TableView too - but these two should suffice.
Virtualized Cell Rendering
The rendering of cells in a JavaFX TableView is virtualized. That means, that the TableView will only create cell rendering objects for the rows / columns that are visible - not for all rows in the backing data set. Thus, if a TableView contains 1,000 rows, but only 10 of them are visible at a time, then the TableView will only create cell rendering objects for the 10 rows that are visible - not for all 1,000 rows. As the user scrolls through the data in the data set displayed in the TableView, the already created cell rendering objects are reused to display the rows that become visible. This way, the TableView can handle very large data sets with less memory overhead from cell rendering objects.
Custom Cell Rendering
The JavaFX TableView enables you to customize the rendering of the cells displayed in the TableView. Each TableColumn added to the TableView has one cell per visible row in the TableView. That means, that if the TableView has 10 visible rows, and 3 columns, then each column (TableColumn) has 10 cells - for a grand total of 30 cells.
As mentioned, the cell count is determined by the number of visible rows and columns (visible cells). It doesn't matter if there are 1000 data items (rows) in the items list of the TableView. It only matters how many rows are visible at a given time. The visible cell objects will be reused to display the values of whatever rows are visible at any given time. This design saves a lot of cell object creation compared to creating a cell object for each column of each row (data item).
To customize the cell rendering you must set a cell factory on the TableColumn for which you want to customize
the cell rendering. You set a cell factory via the TableColumn setCellFactory() method. The
setCellFactory() method takes a Callback interface implementation as parameter. The Callback
implementation creates TableCell instances. Each TableCell instance corresponds to one visible cell in
the TableView. The Callback implementation will be called one time per TableCell to create, so the Callback implementation
does not need to know how many visible cells there are in the TableView.
To better understand how cell factories work, let us look at an example of setting a cell factory on a TableColumn:
customerColumn.setCellFactory((tableColumn) -> {
    TableCell<Customer, String> tableCell = new TableCell<>() {
        @Override
        protected void updateItem(String item, boolean empty) {
            super.updateItem(item, empty);

            this.setText(null);
            this.setGraphic(null);

            if(!empty){
                this.setText(item.toUpperCase());
            }
        }
    };

    return tableCell;
});
This example calls the setCellFactory() method with a Callback implementation as a
Java Lambda Expression.
The Callback implementation creates a TableCell and returns it. The TableCell created is an anonymous subclass
of the TableCell class, where the updateItem() method is overridden. The updateItem()
method on the TableCell subclass is called every time the TableCell is to show the column value for a new item (row).
That is why the updateItem() method first calls setText(null) and setGraphic(null)
- to clear whatever text and graphics the TableCell was showing before.
After clearing the values from the previous item (row), the new value is set - if the cell is not empty that is.
The second parameter passed to updateItem() is a boolean which will have the value
true if the cell is empty. If the cell is empty the TableCell should not show any value.
A TableCell is rendered similarly to a JavaFX Label - meaning it can show both a graphic
and a text. To show a graphic the TableCell updateItem() call the setGraphic() method
with a JavaFX Node object as parameter. To show a text call setText() with a String as parameter.
The TableCell can show both graphic and text at the same time.
Editable TableView
It is possible to make a JavaFX TableView editable. Making a JavaFX TableView editable requires a few steps.
First, you must call the setEditable() method of the TableView, passing a value of true
as parameter. Here is how that looks:
tableView.setEditable(true);
Second, you must set a different cell renderer on the TableColumn's you want to be editable. JavaFX comes with 4 built-in cell renderers you can use:
- TextFieldTableCell
- CheckBoxTableCell
- ChoiceBoxTableCell
- ComboBoxTableCell
The TextFieldTableCell cell renderer is used to enable editing of a cell value using a TextField. The CheckBoxTableCell cell renderer is used to enable editing of a cell value using a CheckBox. The ChoiceBoxTableCell cell renderer is used to enable editing of a cell value using a ChoiceBox. The ComboBoxTableCell cell renderer is used to enable editing of a cell value using a ComboBox.
Here is an example of how to use these cell renderers:
TableView tableView = new TableView();
tableView.setEditable(true);

TableColumn<Person, String> column1 = new TableColumn<>("First Name");
column1.setCellValueFactory(new PropertyValueFactory<>("firstName"));

TableColumn<Person, String> column2 = new TableColumn<>("Last Name");
column2.setCellValueFactory(new PropertyValueFactory<>("lastName"));
column2.setCellFactory(TextFieldTableCell.<Person>forTableColumn());

TableColumn<Person, String> column3 = new TableColumn<>("Category");
column3.setCellValueFactory(new PropertyValueFactory<>("category"));
column3.setCellFactory(ComboBoxTableCell.<Person, String>forTableColumn("Category 1", "Category 2"));

TableColumn<Person, Boolean> column4 = new TableColumn<>("Is XYZ");
column4.setCellValueFactory( cellData -> new ReadOnlyBooleanWrapper(cellData.getValue().getIsXyz()));
column4.setCellFactory(CheckBoxTableCell.<Person>forTableColumn(column4));


tableView.getColumns().add(column1);
tableView.getColumns().add(column2);
tableView.getColumns().add(column3);
tableView.getColumns().add(column4);

tableView.getItems().add(new Person("John"  , "Doe"  , null, false));
tableView.getItems().add(new Person("Jane"  , "Deer" , "Category 1", true));
tableView.getItems().add(new Person("Dinesh", "Gupta", "Category 2", true));
The Person class used in this example looks like this:
public class Person {

    private String firstName = null;
    private String lastName = null;

    private String category = null;

    private boolean isXyz = true;

    public Person() {
    }

    public Person(String firstName, String lastName) {
        this.firstName = firstName;
        this.lastName = lastName;
    }

    public Person(String firstName, String lastName, String category, boolean isXyz) {
        this.firstName = firstName;
        this.lastName  = lastName;
        this.category  = category;
        this.isXyz     = isXyz;
    }

    public String getFirstName() {
        return firstName;
    }

    public void setFirstName(String firstName) {
        this.firstName = firstName;
    }

    public String getLastName() {
        return lastName;
    }

    public void setLastName(String lastName) {
        this.lastName = lastName;
    }

    public String toString() {
        return "{ firstName: '" + this.firstName + ", lastName: " + this.lastName + " }";
    }


    public String getCategory() {
        return this.category;
    }

    public void setCategory(String category) {
        this.category = category;
    }

    public Boolean getIsXyz() {
        return this.isXyz;
    }

    public void setIsXyz(Boolean isXyz) {
        this.isXyz = isXyz;
    }
}
| Tweet | |
Jakob Jenkov | |


