JavaFX MenuButton
Jakob Jenkov |
The JavaFX MenuButton control works like a regular JavaFX Button except it provides a list of options which the user can choose to click. Each of these options function like a separate button - meaning your application can listen for clicks and respond individually to each option. In a way, a JavaFX MenuButton works a bit like a JavaFX MenuBar.
The JavaFX MenuButton can show or hide the menu items. The menu items are usually shown when a little arrow button is clicked in the
MenuButton. The JavaFX MenuButton control is represented by the class javafx.scene.control.MenuButton.
MenuButton vs. ChoiceBox and ComboBox
The MenuButton looks similar to a ChoiceBox and ComboBox, but the difference is, that the MenuButton is designed to trigger an action when you select one of its menu options, whereas ChoiceBox and ComboBox are designed to just note internally what option was selected so it can be read later.
Creating a MenuButton
You create a JavaFX MenuButton by creating an instance of the MenuButton class. The MenuButton constructor
takes a button text and a button graphic. You can pass null for the text and / or the graphic, in case you want
a MenuButton without either text or graphic. Here is an example of creating a JavaFX MenuButton
with only a text label:
MenuItem menuItem1 = new MenuItem("Option 1");
MenuItem menuItem2 = new MenuItem("Option 2");
MenuItem menuItem3 = new MenuItem("Option 3");

MenuButton menuButton = new MenuButton("Options", null, menuItem1, menuItem2, menuItem3);
First 3 MenuItem instances are created, each with a different text. Then a
MenuButton instance is created, passing a button text, a graphic icon (null)
and the 3 MenuItem instances as parameter to the MenuButton constructor.
The second MenuButton constructor parameter is a Node which is used as a graphic icon
which is shown next to the MenuButton text. You could use an ImageView control to
display an an image next to the MenuButton text. Just create an ImageView instance and pass a
reference to that to the MenuButton constructor, instead of null. Here is an example:
MenuItem menuItem1 = new MenuItem("Option 1");
MenuItem menuItem2 = new MenuItem("Option 2");
MenuItem menuItem3 = new MenuItem("Option 3");

FileInputStream input = new FileInputStream("resources/images/iconmonstr-menu-5-32.png");
Image image = new Image(input);
ImageView imageView = new ImageView(image);

MenuButton menuButton = new MenuButton("Options", imageView, menuItem1, menuItem2, menuItem3);
Adding a MenuButton to the Scene Graph
To make a MenuButton visible you must add it to the JavaFX scene graph. This means adding it to
a Scene, or as child of a layout which is attached to a Scene object.
Here is an example that attaches a JavaFX MenuButton to the scene graph:
package com.jenkov.javafx.controls;

import javafx.application.Application;
import javafx.scene.Scene;
import javafx.scene.control.MenuButton;
import javafx.scene.control.MenuItem;
import javafx.scene.layout.HBox;
import javafx.stage.Stage;

import java.io.FileInputStream;


public class MenuButtonExperiments extends Application  {


    @Override
    public void start(Stage primaryStage) throws Exception {
        primaryStage.setTitle("ImageView Experiment 1");


        MenuItem menuItem1 = new MenuItem("Option 1");
        MenuItem menuItem2 = new MenuItem("Option 2");
        MenuItem menuItem3 = new MenuItem("Option 3");

        MenuButton menuButton = new MenuButton("Options", null, menuItem1, menuItem2, menuItem3);

        HBox hbox = new HBox(menuButton);

        Scene scene = new Scene(hbox, 200, 100);
        primaryStage.setScene(scene);
        primaryStage.show();
    }

    public static void main(String[] args) {
        Application.launch(args);
    }

}
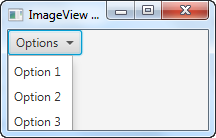
Here is how the application resulting from the above example looks:

MenuButton Font
You can specify what font the text label on a JavaFX MenuButton should be rendered with. You set the font via the
MenuButton setFont() method. Here is an example of setting the font of a JavaFX MenuButton via
setFont():
MenuItem menuItem1 = new MenuItem("Option 1");
MenuItem menuItem2 = new MenuItem("Option 2");

MenuButton menuButton = new MenuButton("Options", null, menuItem1, menuItem2);

Font font = Font.font("Courier New", FontWeight.BOLD, 36);
menuButton.setFont(font);
MenuButton Icon
The JavaFX MenuButton enables you to add a graphical icon which is then displayed next to the menu text - just
like you can do with a regular JavaFX Button. The second example in the
"Create a MenuButton" section shows how to create a MenuButton and pass the graphical icon via the constructor.
However, it is also possible to set the graphical icon of a MenuButton via its setGraphic()
method. Here is how the example from the previous section would look with a graphic icon added to the MenuButton
via its setGraphic() method:
package com.jenkov.javafx.controls;

import javafx.application.Application;
import javafx.scene.Scene;
import javafx.scene.control.MenuButton;
import javafx.scene.control.MenuItem;
import javafx.scene.image.Image;
import javafx.scene.image.ImageView;
import javafx.scene.layout.HBox;
import javafx.stage.Stage;

import java.io.FileInputStream;


public class MenuButtonExperiments extends Application  {


    @Override
    public void start(Stage primaryStage) throws Exception {
        primaryStage.setTitle("ImageView Experiment 1");

        MenuItem menuItem1 = new MenuItem("Option 1");
        MenuItem menuItem2 = new MenuItem("Option 2");
        MenuItem menuItem3 = new MenuItem("Option 3");

        MenuButton menuButton = new MenuButton("Options", null, menuItem1, menuItem2, menuItem3);

        FileInputStream input = new FileInputStream("resources/images/iconmonstr-menu-5-32.png");
        Image image = new Image(input);
        ImageView imageView = new ImageView(image);

        menuButton.setGraphic(imageView);

        HBox hbox = new HBox(menuButton);

        Scene scene = new Scene(hbox, 200, 160);
        primaryStage.setScene(scene);
        primaryStage.show();
    }

    public static void main(String[] args) {
        Application.launch(args);
    }

}
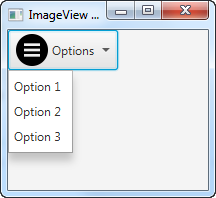
Here is how the application resulting from the above example looks:

Responding to Menu Item Selection
To respond to when a user selects a menu item, add an "on action" event listener to the corresponding
MenuItem object. Here is an example showing you how to add an action event listener to a
MenuItem object:
MenuItem menuItem3 = new MenuItem("Option 3");

menuItem3.setOnAction(new EventHandler<ActionEvent>() {
    @Override
    public void handle(ActionEvent event) {
        System.out.println("Option 3 selected");
    }
});
You can also use a Java Lambda expression instead of an anonymous
implementation of the EventHandler interface. Here is how that looks:
menuItem3.setOnAction(event -> {
    System.out.println("Option 3 selected via Lambda");
});
| Tweet | |
Jakob Jenkov | |


