JavaFX ToolBar
Jakob Jenkov |
The JavaFX ToolBar class (javafx.scene.control.ToolBar) is a horizontal or vertical bar
containing buttons or icons that are typically used to select different tools of a JavaFX application. Actually, a
JavaFX ToolBar can contain other JavaFX controls than just buttons and icons. In fact, you can insert
any JavaFX control into a ToolBar.
Creating a ToolBar
In order to create a JavaFX ToolBar you must first instantiate it. Here is an example of creating a
JavaFX ToolBar instance:
ToolBar toolBar = new ToolBar();
That is all it takes to create a JavaFX ToolBar.
Adding Items to a ToolBar
Once a JavaFX ToolBar has been created, you can add items (JavaFX components) to it. You add items
to a ToolBar by obtaining its collection of items and adding the new item to that collection.
Here is an example of adding an item to a ToolBar:
Button button = new Button("Click Me");

toolBar.getItems().add(button);
Adding a ToolBar to the Scene Graph
In order to make a JavaFX ToolBar visible, it must be added to the JavaFX scene graph. Here is
a full example that shows the creation of a JavaFX ToolBar and adding it to the JavaFX scene graph:
package com.jenkov.javafx;

import javafx.application.Application;
import javafx.scene.Scene;
import javafx.scene.control.*;
import javafx.scene.layout.VBox;
import javafx.stage.Stage;

public class ToolBarExample extends Application {
    public static void main(String[] args) {
        launch(args);
    }

    @Override
    public void start(Stage primaryStage) {
        primaryStage.setTitle("JavaFX App");

        ToolBar toolBar = new ToolBar();

        Button button1 = new Button("Button 1");
        toolBar.getItems().add(button1);

        Button button2 = new Button("Button 2");
        toolBar.getItems().add(button2);

        VBox vBox = new VBox(toolBar);

        Scene scene = new Scene(vBox, 960, 600);

        primaryStage.setScene(scene);
        primaryStage.show();
    }

}
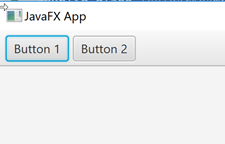
The JavaFX GUI resulting from this ToolBar example would look similar to this:
Vertical Oriented ToolBar
By default a JavaFX ToolBar displays the items added to it in a horizontal row.
It is possible to get the ToolBar to display the items vertically instead, so the ToolBar
becomes a vertical toolbar. To make the ToolBar display its items vertically, you call
its setOrientation() method. Here is an example of setting the orientation of a ToolBar
to vertical:
toolBar.setOrientation(Orientation.VERTICAL);
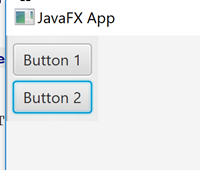
Here is a screenshot of how the JavaFX ToolBar from the previous section looks in vertical orientation:
Separating Items in a ToolBar
You can add a visual separator to a JavaFX ToolBar. The visual separator is typically displayed as
a vertical or horizontal line between the items in the ToolBar. Here is an example of adding a
separator to a ToolBar:
Button button1 = new Button("Button 1");
toolBar.getItems().add(button1);

toolBar.getItems().add(new Separator());

Button button2 = new Button("Button 2");
toolBar.getItems().add(button2);
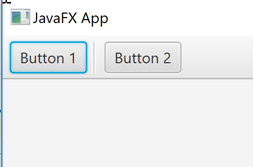
Here is a screenshot of how a visual separator between items in a ToolBar looks:
| Tweet | |
Jakob Jenkov | |


