JavaFX Region
Jakob Jenkov |
The JavaFX Region class is the base class for all JavaFX layout panes, like Pane etc. The JavaFX Region class has a set of properties and characteristics which are shared by all the JavaFX layout classes which extend Region.
JavaFX Region Class Hierarchy
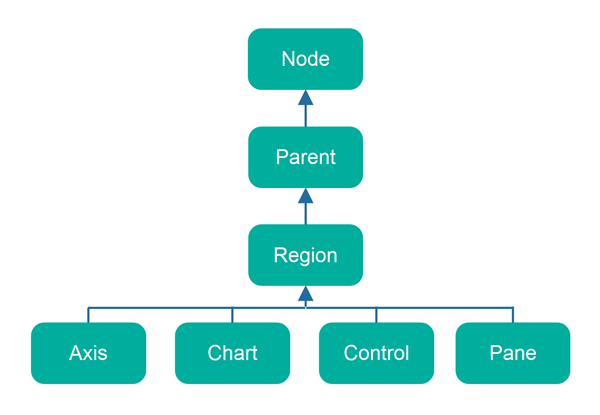
The class hierarchy around the JavaFX Region class looks like this:

Remember, that JavaFX has many classes which are subclasses of Axis, Chart, Control and Pane. All of these are also indirect subclasses of Region, and will also have the same properties as Region.
JavaFX Region Properties
The properties of the JavaFX Region class which are shared by its subclasses are:
- Background
- Content Area
- Padding
- Borders
- Margin
- Region Insets
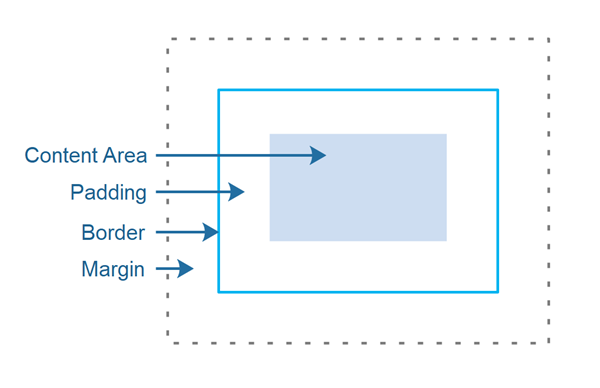
These concepts are illustrated here:

The content area is where the layout container will draw its children within.
The padding is the space between the content area and the border.
The border is a line (or similar) which can be displayed around the content area + padding of a Region.
The margin is the space between a Region and other components within its own parent layout container.
Set Padding
You can set the padding of a JavaFX Region, or subclass of Region, using its setPadding()
method. In this example I use a JavaFX HBox which is also a subclass of Region,
because not all Region subclasses respect the padding set on them (Pane doesn't, as far as I can see).
Here is how to set the padding of an HBox:
HBox hBox = new HBox(new Label("Hello Pane"));

hBox.setPadding(new Insets(10));
Set Border
It is possible to set a border on a JavaFX Region. You can use both an standard stroke as border (a line) or a border image. Border images could be used to draw a picture frame around a Region - just like the frame around a painting. Border strokes are more common though.
Set a Stroke Border
Here is an example of setting a stroke border on a Region. In this example it is the Region subclass Pane that is used. To understand what terms like "stroke line joine", "stroke line cap" etc. mean, check out my SVG Stroke tutorial. The concepts (most likely) mean the same both in SVG and JavaFX, although the details of the implementation may vary. I might dive deeper into all this in JavaFX one day.
Pane  pane  = new Pane();

StrokeType     strokeType     = StrokeType.INSIDE;
StrokeLineJoin strokeLineJoin = StrokeLineJoin.MITER;
StrokeLineCap  strokeLineCap  = StrokeLineCap.BUTT;
double         miterLimit     = 10;
double         dashOffset     = 0;
List<Double>   dashArray      = null;

BorderStrokeStyle borderStrokeStyle =
        new BorderStrokeStyle(
                strokeType,
                strokeLineJoin,
                strokeLineCap,
                miterLimit,
                dashOffset,
                dashArray
        );


BorderStroke borderStroke =
        new BorderStroke(
                Color.valueOf("08ff80"),
                borderStrokeStyle,
                new CornerRadii(0),
                new BorderWidths(8)
        );

Border border = new Border(borderStroke);

pane.setBorder(border);
Set Background
You can set the background of a JavaFX Region using the JavaFX Background class. It may take you a bit of meddling with it before you have it initialized correctly. You can set both a color filled background, or use an image as background.
Set Background Color
You can set a background color for a JavaFX Region like this:
Pane  pane  = new Pane();

BackgroundFill backgroundFill =
        new BackgroundFill(
                Color.valueOf("#ff00ff"),
                new CornerRadii(10),
                new Insets(10)
                );

Background background =
        new Background(backgroundFill);

pane.setBackground(background);
The CornerRadii instance passed to the BackgroundFill constructor sets the radius of the corners of the background fill - if round corners are wanted. If not, set corner radius to 0.
The Insets instance passed to the BackgroundFill constructor sets the internal padding between the edge of the Region and the background fill.
It is possible to have several BackgroundFill instances applied on top of each other. Here is an example of how to do that:
Pane  pane  = new Pane();

BackgroundFill backgroundFill1 =
        new BackgroundFill(
                Color.valueOf("#ff00ff"),
                new CornerRadii(0),
                new Insets(0)
                );

BackgroundFill backgroundFill2 =
        new BackgroundFill(
                Color.valueOf("#00ff00"),
                new CornerRadii(10),
                new Insets(10)
                );

Background background =
        new Background(backgroundFill1, backgroundFill2);

pane.setBackground(background);
In this example, backgroundFill2 will be drawn on top of backgroundFill1 . Since backgroundFill2 has corner radius and a padding set, backgroundFill1 will be visible around the edges of backgroundFill2.
Set Background Image
It is also possible to use an image as background for a JavaFX Region. Here is an example of using an image as background for a Region (a Pane):
Pane pane = new Pane();

String filePath = "data/background.jpg";
Image image = null;
try {
    image = new Image(new FileInputStream(filePath));
} catch (FileNotFoundException e) {
    e.printStackTrace();
}

BackgroundImage backgroundImage =
    new BackgroundImage(
        image,
        BackgroundRepeat.NO_REPEAT,  // repeat X
        BackgroundRepeat.NO_REPEAT,  // repeat Y
        BackgroundPosition.CENTER,   // position
        new BackgroundSize(
            100,   // width  = 100%
            100,   // height = 100%
            true,  // width is percentage
            true,  // height is percentage
            true,  // contain image within bounds
            true   // cover all of Region content area
        )
    );

pane.setBackground(new Background(backgroundImage));
| Tweet | |
Jakob Jenkov | |


