JavaFX MenuBar
Jakob Jenkov |
The JavaFX MenuBar provides JavaFX applications with a visual drop down menu similar to that most
desktop applications have at the top of their application window. The JavaFX MenuBar is represented
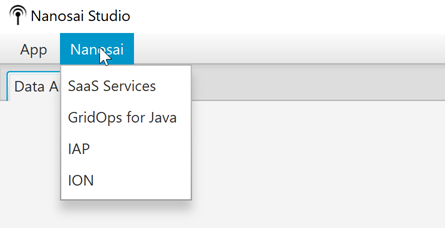
by the class javafx.scene.control.MenuBar . Here is an example screenshot of what a
JavaFX MenuBar can look like:
Creating a MenuBar Instance
Before you can use the JavaFX MenuBar you must create a MenuBar instance.
Here is an example of creating a JavaFX MenuBar instance:
MenuBar menuBar = new MenuBar();
Adding a MenuBar to the Scene Graph
Before a MenuBar becomes visible you will have to add it to the JavaFX scene graph. Here is
an example of adding a JavaFX MenuBar to the scene graph:
import javafx.application.Application;
import javafx.scene.Scene;
import javafx.scene.control.Menu;
import javafx.scene.control.MenuBar;
import javafx.scene.control.MenuItem;
import javafx.scene.layout.VBox;
import javafx.stage.Stage;

public class JavaFXApp extends Application {

    public static void main(String[] args) {
        launch(args);
    }

    @Override
    public void start(Stage primaryStage) {
        primaryStage.setTitle("JavaFX App");

        MenuBar menuBar = new MenuBar();

        VBox vBox = new VBox(menuBar);

        Scene scene = new Scene(vBox, 960, 600);

        primaryStage.setScene(scene);
        primaryStage.show();
    }
}
Notice how the MenuBar is added to the root layout (VBox) of the JavaFX scene.
This places the MenuBar at the top of the application window.
Note that the above example does not add any menus or menu items to the MenuBar, so if you run the
example you will not actually see the MenuBar. We will see how to add menus and menu items
in the following sections.
Creating Menu Instances
Once the MenuBar instance is created, you can add Menu instances to it
(javafx.scene.control.Menu . A Menu instance represents a single vertical
menu with nested menu items. Thus, you can add multiple MenuBar instances to a
MenuBar to add multiple vertical drop down menus.
Here is an example of adding a Menu to a MenuBar :
Menu menu1 = new Menu("Menu 1");

MenuBar menuBar = new MenuBar();

menuBar.getMenus().add(menu1);
Here is a screenshot showing the JavaFX MenuBar as configured by the example code above:
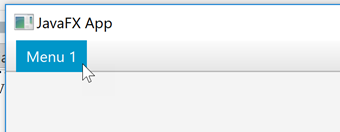
As you can see, there is only a single menu in the MenuBar titled "Menu 1" . This menu
has no menu items nested under it. We will see how to add menu items to a Menu in
the following sections.
Menu Graphics
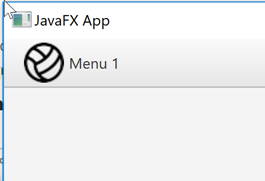
You can set a graphic icon for a Menu by calling its setGraphic() method.
The graphic icon will be displayed next to the text label of the menu. Here is an example of
setting a graphic icon for a JavaFX Menu instance:
Menu menu = new Menu("Menu 1");
menu.setGraphic(new ImageView("file:volleyball.png"));
Here is how the resulting menu could look in a JavaFX application:
Menu Events
A JavaFX Menu instance can fire several events which you can listen for in your application.
The most commonly used events are:
onShowingonShownonHidingonHidden
When a Menu is clicked with the mouse it shows its contents. This action fires the event
onShowing before the Menu starts showing its menu items. Once the menu is fully visible
the onShown event is fired.
When an shown (open) Menu is clicked with the mouse it hides its contents again. This action fires the
event onHiding before the Menu starts hiding its menu items. Once the menu is fully hidden
the onHidden event is fired.
You can set Menu event listeners for the events above using the methods
setOnShowing(), setOnShown(), setOnHiding() and setOnHidden().
Here is an example of setting event listeners for these events on a JavaFX Menu :
Menu menu = new Menu("Menu 1");

menu.setOnShowing(e -> { System.out.println("Showing Menu 1"); });
menu.setOnShown  (e -> { System.out.println("Shown Menu 1"); });
menu.setOnHiding (e -> { System.out.println("Hiding Menu 1"); });
menu.setOnHidden (e -> { System.out.println("Hidden Menu 1"); });
The Menu event listeners set above only print out a message to the console when the events
fired. You could do something more advanced in case you needed to.
Adding Menu Items
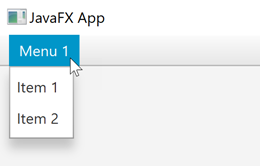
Once you have created a Menu instance you must add one or more MenuItem instances
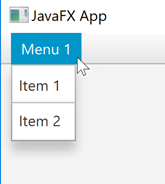
to it. Each MenuItem corresponds to a menu item in the menu it is added to. Here is an example
of adding 2 MenuItem instances to a Menu, which is then added to a MenuBar:
Menu menu = new Menu("Menu 1");
MenuItem menuItem1 = new MenuItem("Item 1");
MenuItem menuItem2 = new MenuItem("Item 2");

menu.getItems().add(menuItem1);
menu.getItems().add(menuItem2);

MenuBar menuBar = new MenuBar();
menuBar.getMenus().add(menu);
Here is what the resulting JavaFX MenuBar would look like, if used in a JavaFX application:
MenuItem Graphics
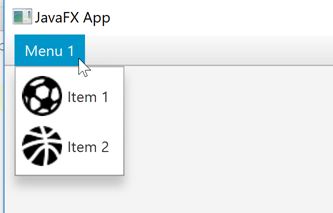
You can add an icon to a menu item. You add a graphic icon to a MenuItem by calling its
setGraphic() method, passing as parameter the graphic you want to use for the given MenuItem.
Here is an example that adds images to the menu items created in the example in the previous section:
Menu menu = new Menu("Menu 1");

MenuItem menuItem1 = new MenuItem("Item 1");
menuItem1.setGraphic(new ImageView("file:soccer.png"));

MenuItem menuItem2 = new MenuItem("Item 2");
menuItem1.setGraphic(new ImageView("file:basketball.png"));

menu.getItems().add(menuItem1);
menu.getItems().add(menuItem2);

MenuBar menuBar = new MenuBar();
menuBar.getMenus().add(menu);
Here is how a JavaFX MenuBar looks with graphic icons added to its menu items:
MenuItem Events
The MenuBar configurations created in the previous examples do not react if you select any of the
menu items. In order to respond to the selection of a MenuItem you must set an event listener
on the MenuItem. Here is an example of adding an event listener to a JavaFX MenuItem:
MenuItem menuItem1 = new MenuItem("Item 1");

menuItem1.setOnAction(e -> {
    System.out.println("Menu Item 1 Selected");
});
Notice the Java Lambda added as parameter to the
setOnAction() method of the MenuItem . This lambda expression is executed when
the menu item is selected.
Submenus
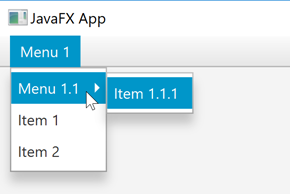
The JavaFX MenuBar supports multiple layers of menus. A menu nested inside another menu is called
a submenu. The Menu class extends the MenuItem class and can therefore be used as
a menu item inside another Menu instance. Here is an example that creates a single JavaFX menu with
a submenu inside:
Menu menu = new Menu("Menu 1");

Menu subMenu = new Menu("Menu 1.1");
MenuItem menuItem11 = new MenuItem("Item 1.1.1");
subMenu.getItems().add(menuItem11);
menu.getItems().add(subMenu);

MenuItem menuItem1 = new MenuItem("Item 1");
menu.getItems().add(menuItem1);

MenuItem menuItem2 = new MenuItem("Item 2");
menu.getItems().add(menuItem2);

MenuBar menuBar = new MenuBar();
menuBar.getMenus().add(menu);
The JavaFX MenuBar resulting from the above example will look similar to this:
Check Menu Items
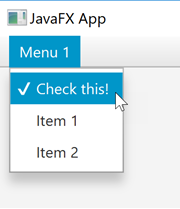
The JavaFX MenuBar supports using check menu items in a menu. A check menu item is
a menu item that can be "selected" and remain selected until unselected later. A small check mark is
displayed next to the check menu item as long as it remains selected.
The check menu item is represented by the CheckMenuItem (javafx.scene.control.CheckMenuItem)
class. Here is an example of a JavaFX menu with a CheckMenuItem in:
CheckMenuItem checkMenuItem = new CheckMenuItem("Check this!");

menu.getItems().add(checkMenuItem);
The Menu instance then need to be added to a MenuBar to be visible, as you have seen in
earlier examples. Here is how the resulting menu looks, with the check menu menu item checked:
Radio Menu Item
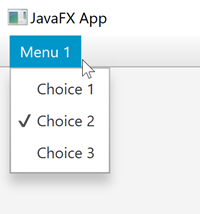
The JavaFX MenuBar also supports radio menu items. Radio menu items are menu items of which only
one of a set of menu items can be selected - just like standard JavaFX radio buttons.
The radio menu item is represented by the RadioMenuItem. The RadioMenuItem instance
must be added to a ToggleGroup to make them mutually exclusive. That is how JavaFX knows which
RadioMenuItem instance belong together. Here is an example of a JavaFx menu that
uses a set of radio menu items:
Menu menu = new Menu("Menu 1");

RadioMenuItem choice1Item = new RadioMenuItem("Choice 1");
RadioMenuItem choice2Item = new RadioMenuItem("Choice 2");
RadioMenuItem choice3Item = new RadioMenuItem("Choice 3");

ToggleGroup toggleGroup = new ToggleGroup();
toggleGroup.getToggles().add(choice1Item);
toggleGroup.getToggles().add(choice2Item);
toggleGroup.getToggles().add(choice3Item);

menu.getItems().add(choice1Item);
menu.getItems().add(choice2Item);
menu.getItems().add(choice3Item);

MenuBar menuBar = new MenuBar();
menuBar.getMenus().add(menu);
Here is how the JavaFx menu resulting from this example code looks:
Menu Item Separators
The MenuBar supports menu item separators. A separator is a horizontal line that separates groups
of menu items. A separator is often used to signal to users what menu items are related to each other.
Menu item separators are represented by the SeparatorMenuItem class. Here is an example of a
menu with two menu items separated by a SeparatorMenu:
MenuItem item1 = new MenuItem("Item 1");
MenuItem item2 = new MenuItem("Item 2");
SeparatorMenuItem separator = new SeparatorMenuItem();

menu.getItems().add(item1);
menu.getItems().add(separator);
menu.getItems().add(item2);

MenuBar menuBar = new MenuBar();
menuBar.getMenus().add(menu);
Here is how the resulting JavaFX menu would look like:
Custom Control Menu Items
The JavaFX MenuBar also supports using custom JavaFX controls as menu items. To do so you need
to use the CustomMenuItem (javafx.scene.control.CustomMenuItem) class.
The CustomMenuItem class has a setContent() method which you can use to set the
custom JavaFX control to show in the menu. Here is an example that shows both a JavaFX Button and
a JavaFX Slider as custom menu items:
Menu menu = new Menu("Menu 1");

Slider slider = new Slider(0, 100, 50);

CustomMenuItem customMenuItem = new CustomMenuItem();
customMenuItem.setContent(slider);
customMenuItem.setHideOnClick(false);
menu.getItems().add(customMenuItem);

Button button = new Button("Custom Menu Item Button");
CustomMenuItem customMenuItem2 = new CustomMenuItem();
customMenuItem2.setContent(button);
customMenuItem2.setHideOnClick(false);
menu.getItems().add(customMenuItem2);

MenuBar menuBar = new MenuBar();
menuBar.getMenus().add(menu);
Notice the call to CustomMenuItem setHideOnClick() with the value false
as parameter. This is done to keep the menu open while the user interacts with the custom menu item control.
If you set the value to true the menu will close as soon as the user clicks the control the first time,
making further interaction impossible. For normal menu items you actually do want the menu to close immediately,
but for some custom menu items you may not want that. The menu can still be closed by clicking on the menu title
again.
Here is how the resulting menu looks:

| Tweet | |
Jakob Jenkov | |


